

搜索到
9
篇与
» typecho
的结果
-
 Typecho 用一个程序建多个网站 1.首先绑定两个域名(以下称 A域名 和 B域名)到空间目录上。2.接着把typecho上传到空间里,打开 A域名 时,typecho就会自动检测并开始安装,安装是请修改数据库表前缀为 A_ ,安装过程非常顺利。3.安装完后,把程序自动生成的文件config.inc.php下载下来备份,并删除服务器上的config.inc.php。4.然后,用 B域名 打开网站,此时,typecho会再度自动检测并开始安装,此时请修改数据库表前缀为 B_ ,安装过程也一样非常的顺利。5.再次把config.inc.php这个文件下载下来,对比前后两个文件,我们可以发现它们之间的区别就在于最后的数据库及表前缀的区别。6.这两个文件是非常的相似,那么我们就可以模仿wordpress,让它也能一个程序建多个站点了。if($_SERVER["HTTP_HOST"]=="A域名.com" || $_SERVER["HTTP_HOST"]=="www.A域名.com"){ $db = new Typecho_Db('Mysql', 'A_'); } else if($_SERVER["HTTP_HOST"]=="B域名.com" || $_SERVER["HTTP_HOST"]=="www.B域名.com"){ $db = new Typecho_Db('Mysql', 'B_'); } $db->addServer(array ( 'host' => 'localhost', 'user' => '数据库用户名', 'password' => '数据库密码', 'charset' => 'utf8', 'port' => '3306', 'database' => '数据库名', ), Typecho_Db::READ | Typecho_Db::WRITE); Typecho_Db::set($db);'这样一来,虽然是同一个程序,但当用 A域名 打开时,它调用的是前缀为A_的数据,当用 B域名 打开时,它调用的是前缀为B_的数据
 -
Typecho自定义调用如热门文章随机文章等 Typecho自定义调用这是面向模板开发者的一篇干货文章,通过学习下面的两个事例,你可以通过调整数据库语句来实现自定义调用文章,如随机文章等。调用热门文章在functions.php中加入如下代码class Widget_Post_hot extends Widget_Abstract_Contents { public function __construct($request, $response, $params = NULL) { parent::__construct($request, $response, $params); $this->parameter->setDefault(array('pageSize' => $this->options->commentsListSize, 'parentId' => 0, 'ignoreAuthor' => false)); } public function execute() { $select = $this->select()->from('table.contents') ->where("table.contents.password IS NULL OR table.contents.password = ''") ->where('table.contents.status = ?','publish') ->where('table.contents.created <= ?', time()) ->where('table.contents.type = ?', 'post') ->limit($this->parameter->pageSize) ->order('table.contents.views', Typecho_Db::SORT_DESC); $this->db->fetchAll($select, array($this, 'push')); } }然后在前台调用热门文章时就可以这样写了<?php $this->widget('Widget_Post_hot@hot', 'pageSize=6')->to($hot); ?> <?php while($hot->next()): ?> 文章链接:<?php $hot->permalink() ?> 文章标题:<?php $hot->title(); ?> <!--等等--> <?php endwhile; ?>这种写法非常原生,使用方法也同typecho调用某分类下的文章语法一致调用指定文章集合在functions.php中加入如下代码class Widget_Post_fanjubiao extends Widget_Abstract_Contents { public function __construct($request, $response, $params = NULL) { parent::__construct($request, $response, $params); $this->parameter->setDefault(array('pageSize' => $this->options->commentsListSize, 'parentId' => 0, 'ignoreAuthor' => false)); } public function execute() { $select = $this->select()->from('table.contents') ->where("table.contents.password IS NULL OR table.contents.password = ''") ->where('table.contents.type = ?', 'post') ->limit($this->parameter->pageSize) ->order('table.contents.modified', Typecho_Db::SORT_DESC); if ($this->parameter->fanjubiao) { $fanju=explode(",",$this->parameter->fanjubiao); $select->where('table.contents.cid in ?', $fanju); } $this->db->fetchAll($select, array($this, 'push')); } }然后在前台调用热门文章时就可以这样写了<?php $week1="728,1197";//指定文章id集合多个文章中间用英文逗号隔开 $this->widget('Widget_Post_fanjubiao@fanjubiao', 'fanjubiao='.$week1)->to($fanju); ?> <?php while($fanju->next()): ?> 文章链接:<?php $fanju->permalink() ?> 文章标题:<?php $fanju->title(); ?> <!--等等--> <?php endwhile; ?>这种写法非常原生,使用方法也同typecho调用某分类下的文章语法一致总结这样的写法只要懂得数据库语句,就可以定制各种自己所需的调用文章!语法贴近原生且内部支持调用各种函数,比如缩略图函数等等!来源:泽泽社长https://qqdie.com/archives/typecho-custom-call.html
-
typecho利用H5代码实现视频播放 前言HTML5 Video标签的使用,实现视频播放,这里我调用的是托管在Onedrive上的视频的地址,这里用的Video标签含有src、poster、preload、controls、width、height等几个属性亲测适用typecho。示例这里直接写个实例给大家看,其中的属性看下面的属性表格。实例<video width="100%" height="auto" poster="您的视频预显示图像" preload="none" controls="controls"> <source src="您的视频地址" /></video>演示属性值描述autoplayautoplay如果出现该属性,则视频在就绪后马上播放。controlscontrols如果出现该属性,则向用户显示控件,比如播放按钮。looploop如果出现该属性,则当媒介文件完成播放后再次开始播放。mutedmuted规定视频的音频输出应该被静音。posterURL规定视频下载时显示的图像,或者在用户点击播放按钮前显示的图像。preloadpreload如果出现该属性,则视频在页面加载时进行加载,并预备播放。如果使用 "autoplay",则忽略该属性。srcurl要播放的视频的 URL。heightpixels设置视频播放器的高度。widthpixels设置视频播放器的宽度。结语注释:Internet Explorer 8 以及更早的版本不支持 <video> 标签。请使用现代主流浏览器。来源:喵斯基部落https://www.moewah.com/mip/69.html
-
Typecho根据文章cid获取文章信息 如上图,就是基于这个功能,实现的轮播图,填写了文章cid,获取了文章标题,描述,缩略图和链接。其实这个功能,应该有很多人发过,不过大多都是需要写查询函数的,我呢因为懒,所以经过试验发现了这种不用自己写函数的写法。代码如下代码,其中cid=1就是获取cid为1的文章信息,可以改成你需要获取的文章cid。<?php $this->widget('Widget_Archive@indexxiu', 'pageSize=1&type=post', 'cid=1')->to($ji); ?> 标题:<?php $ji->title(); ?> 链接:<?php $ji->permalink(); ?> 描述:<?php $ji->description(); ?> ...获取多个上边的截图,就是获取了三个文章,来实现的,代码如下,其中166,163,160就是对应的三个文章的cid<?php $lunbo="166,163,160"; $hang = explode(",", $lunbo); $n=count($hang); $html=""; for($i=0;$i<$n;$i++){ $this->widget('Widget_Archive@lunbo'.$i, 'pageSize=1&type=post', 'cid='.$hang[$i])->to($ji); if($ji->fields->thumb){$img=$ji->fields->thumb;} if($i==0){$no=" sx_no";}else{$no="";} $html=$html.'<div class="sx_vt'.$no.'" name="'.$i.'" title="'.$ji->title.'" intro="'.$ji->description.'" hsrc="'.$ji->permalink.'"><img src="./images/load.jpg" bsrc="'.$img.'" alt="'.$ji->title.'"></div>'; } echo $html; ?>原理就是利用for循环,来实现的多次点播。提示代码中的Widget_Archive@后面的参数可以随便写,同一个页面多次使用时参数不能相同,否则会重复输出同一条数据。来源:https://qqdie.com/archives/typecho-cidgetinfo.html
-
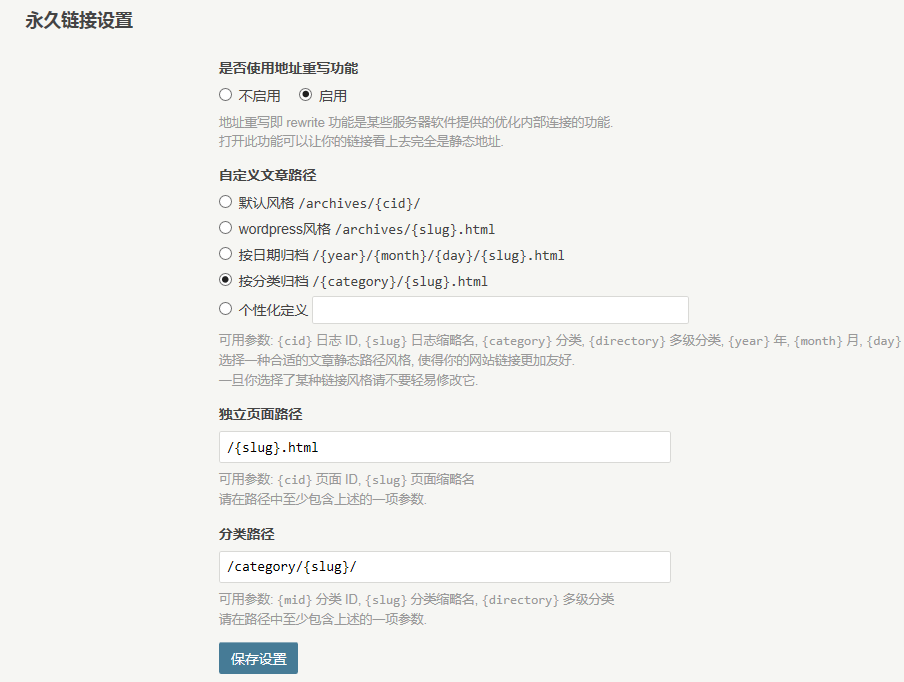
typecho开启伪静态,去掉那个讨厌的index.php 1.配置服务器的rewrite规则如果在保存上述配置的时候,typecho无法自动配置,那么你可能需要手动配置服务器的rewrite规则。Linux Apache 环境 (.htaccess):<IfModule mod_rewrite.c> RewriteEngine On # 下面是在根目录,文件夹要修改路径 RewriteBase / RewriteCond %{REQUEST_FILENAME} !-f RewriteCond %{REQUEST_FILENAME} !-d RewriteRule ^(.*)$ /index.php/$1 [L] </IfModule> Linux Apache 环境(Nginx):location / { index index.html index.php; if (-f $request_filename/index.html) { rewrite (.*) $1/index.html break; } if (-f $request_filename/index.php) { rewrite (.*) $1/index.php; } if (!-f $request_filename) { rewrite (.*) /index.php; } } Windows IIS 伪静态 (httpd.ini):[ISAPI_Rewrite] # 3600 = 1 hour CacheClockRate 3600 RepeatLimit 32 # 中文tag解决 RewriteRule /tag/(.*) /index\.php\?tag=$1 # sitemapxml RewriteRule /sitemap.xml /sitemap.xml [L] RewriteRule /favicon.ico /favicon.ico [L] # 内容页 RewriteRule /(.*).html /index.php/$1.html [L] # 评论 RewriteRule /(.*)/comment /index.php/$1/comment [L] # 分类页 RewriteRule /category/(.*) /index.php/category/$1 [L] # 分页 RewriteRule /page/(.*) /index.php/page/$1 [L] # 搜索页 RewriteRule /search/(.*) /index.php/search/$1 [L] # feed RewriteRule /feed/(.*) /index.php/feed/$1 [L] # 日期归档 RewriteRule /2(.*) /index.php/2$1 [L] # 上传图片等 RewriteRule /action(.*) /index.php/action$1 [L] nginx 配置server { listen 80; server_name yourdomain.com; root /home/yourdomain/www/; index index.html index.htm index.php; if (!-e $request_filename) { rewrite ^(.*)$ /index.php$1 last; } location ~ .*\.php(\/.*)*$ { include fastcgi.conf; fastcgi_pass 127.0.0.1:9000; } access_log logs/yourdomain.log combined; } apache 配置<IfModule mod_rewrite.c> RewriteEngine On RewriteBase / RewriteCond %{REQUEST_FILENAME} !-f RewriteCond %{REQUEST_FILENAME} !-d RewriteRule ^(.*)$ index.php [L,E=PATH_INFO:$1] </IfModule> 2.后台配置typecho伪静态如图,在typecho后台,开启伪静态,并选择你喜好的url形式:具体操作,根据本人实际操作如下我的虚拟主机是apache的,在网站根目录找到.htaccess,有的没有可能是设置了隐藏文件,显示隐藏文件就能看到了。然后编辑.htaccess文件,加入上文中对应的apache配置代码保存。然后去typecho程序后台,设置>永久链接,按照上文中图片的设置,保存即可。来源:https://qqdie.com/archives/typecho-open-pseudo-static-get-rid-of-that-pesky-index-the-php.html